Riak is a distributed "NoSQL style" data store based on Dynamo. Written in Erlang, it is available as open source, being maintained by Basho Technologies. A typical install will involve several nodes operating as a cluster, with individual data objects replicated across some subset of multiple nodes. One of the primary goals of the system is to provide continued operation through node failures, upgrades, and cluster modifications. As a result, migrating a production cluster without outages becomes a relatively simple task, accomplished by either adding new nodes and removing old nodes, or with newer versions, by directly replacing nodes.
Setting up the New Nodes
Before any cluster changes can take place, the new nodes have to be set up. Versions 1.2+ have excellent clustering tools, and depending on what version the existing cluster is running, there may be extra configuration necessary to handle the intermediate mixed-version cluster if an upgrade is to take place. Be sure to refer to the documentation Basho provides for installing Riak.
When migrating a live cluster, the network is of utmost importance. Keeping latency low and predictable will keep the impact small. If a fast, reliable network can not be established, a live migration may not be possible. Additionally one should have some level of confidence that there will be no network splits between the clusters. While Riak is designed to handle such problems, removing them from the equation will greatly increase the chances of a smooth transition.
After installation, there are a few things to check before starting Riak. Of particular importance is that the Erlang key in /etc/riak/vm.args is the same as the one that the existing nodes use. The node name should be changed from the default node@127.0.0.1 to use the correct non-local ip. If Riak (1.2+) has been started before the name is changed, the following command has to be run even though it is a stand-alone node:
riak-admin cluster replace
Older Riak versions should have the /var/lib/riak/ring directory emptied before a restart in that situation.
In /etc/riak/app.config, the http (or pb, if using protobuffs) should be configured with an appropriate non-local ip. More info on configuration files can be found here. In addition, you should make sure that there are no firewall rules blocking communication between the new nodes and the existing cluster.
The Important Commands
Before touching the existing cluster, it is important to become familiar with the tools available and necessary for the migration ahead of time. There are some differences depending on the version of Riak being used.
Pre-1.2
Versions prior to 1.2 have immediately acting cluster methods. All modifications are done individually with the following commands.
# Join this node to the cluster withriak-admin join # Remove this node from the cluster riak-admin leave
1.2+
Riak 1.2 introduced the staged cluster modifications. Rather than each action occurring immediately and separately, they are all staged first for review. From that point, the changes can either be thrown out or committed as a single action. The following commands will be used to handle and monitor the migration.
# Join this node to the cluster withriak-admin cluster join # Remove this node from the cluster riak-admin cluster leave # Move partitions from 1 to 2, then remove 1 riak-admin cluster replace # See currently staged cluster modifications riak-admin cluster plan # Clear all staged changes riak-admin cluster clear # Commit all staged changes riak-admin cluster commit # Status of cluster members (ownership, etc.) riak-admin member-status # Additional cluster status information riak-admin ring-status
All Versions
There are two monitoring commands that are available with all versions.
# Whether all nodes agree on the state of the ring
# and who the members are
riak-admin ringready

# Status of partitions pending transfer
riak-admin transfers
Example Setup
For the purposes of illustration, assume the following production setup:
- Existing Cluster
- old1@192.168.1.2
- old2@192.168.1.3
- old3@192.168.1.4
- New Nodes / Final Cluster
- new1@192.168.1.5
- new2@192.168.1.6
- new3@192.168.1.7
- Load balancer in front of Riak, routing queries to cluster nodes
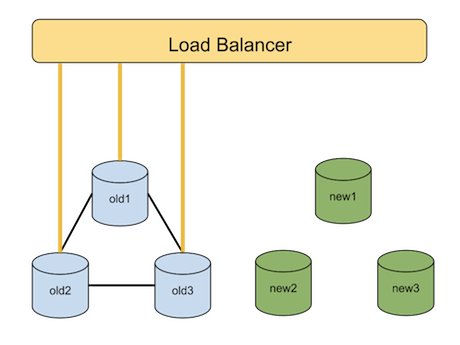
Approach 1: Join And Leave
This method will work with all versions of Riak. All of the new nodes will join, assuming ownership of part of the ring, resulting in a large intermediate cluster. The old nodes will then leave, relinquishing ownership of the remainder of the ring, leaving the desired final cluster. Patience will be key.
Join the New Nodes
The first step is to join the new nodes to the existing cluster. This will form a single, large cluster and cause a rebalance where ownership of some partitions are transferred to the new nodes. With Riak 1.2+, the following steps should be run (note the host on which the join commands are run).
# Stage join new1 to the cluster
new1$ riak-admin cluster join old1@192.168.1.2

# Stage join new2 to the cluster
new2$ riak-admin cluster join old1@192.168.1.2

# Stage join new3 to the cluster
new3$ riak-admin cluster join old1@192.168.1.2

# View staged changes
new3$ riak-admin cluster plan

# Make the changes
new3$ riak-admin cluster commit
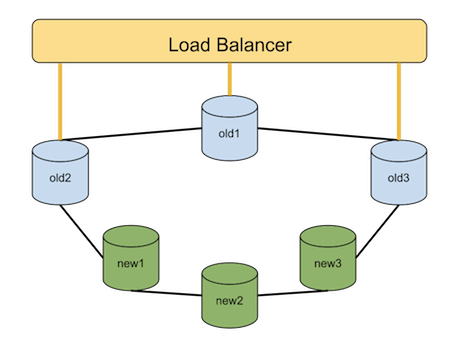
Check that all nodes are now part of the cluster with ringready. At this point, the cluster will decide which nodes should have which partitions and begin to work toward that state. The current and desired (pending) percent ownership of the ring can be monitored with member-status. Total pending transfers and (1.2+) information about active transfers will be seen with transfers. Depending on the size of the cluster, amount of data and load, this can take a while to finish. Look for the percent ring ownership to settle and there to be no remaining transfers. Once the cluster has settled, the new nodes can be added to the load balancer to take point on incoming requests.

Riak 1.1 and earlier is a similar process, though each node will have to be added individually. Wait for all transfers to finish before adding the next node.
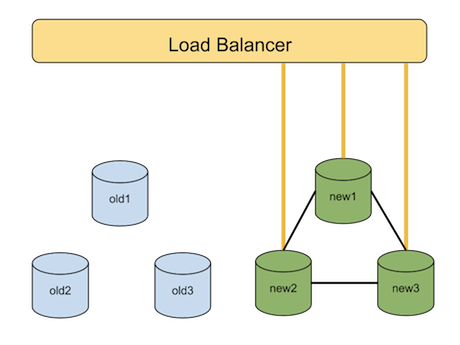
Leave the Old Nodes
The next step is to remove the old nodes from the cluster. It is essentially the opposite of what was done to join the new nodes. First remove the old nodes from the load balancer to prevent them from handling incoming requests as they leave.

Then, with Riak 1.2+, run:
# Stage removal of old1 from the cluster
old1$ riak-admin cluster leave

# Stage removal of old2 from the cluster
old2$ riak-admin cluster leave

# Stage removal of old3 from the cluster
old3$ riak-admin cluster leave

# View staged changes
old3$ riak-admin cluster plan

# Make the changes
old3$ riak-admin cluster commit
Follow along progress with member-status and transfers until the old nodes have completely given up ownership and left the cluster. Confirm with ringready.
Again, Riak 1.1 and earlier will have old nodes leave one at a time, waiting for rebalancing to complete in between each.
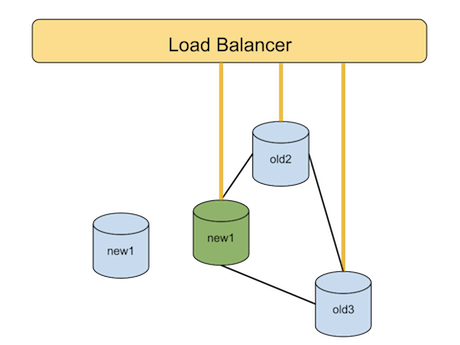
Approach 2: The Replace
With Riak 1.2+, it's possible to do the migration by using the new replace command. In this case, both the join and the replace are staged and committed together. This will have to be done for each node to be replaced, but will avoid having to rebalance the entire cluster. The current node to be replaced should be removed from the load balancer prior to starting the replacement.
new1$ riak-admin cluster join old1@192.168.1.2 # Stage join new1 new3$ riak-admin cluster replace old1@192.168.1.2 new1@192.168.1.5 # Stage replacement 1 new3$ riak-admin cluster plan # View staged changes new3$ riak-admin cluster commit # Make changes
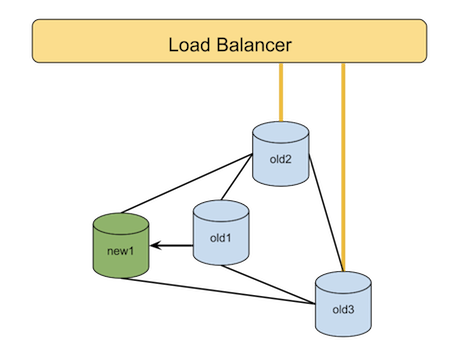
Once the change settles, as indicated by the new node returning true for riak-admin ringready, the new node can be added to the load balancer and the next node replacement can be performed.
The example here has an easy one-to-one mapping. If the cluster sizes are different, simply stage additional joins or leaves as needed after the replacements are done, similarly to Approach 1.
In Case of Stuck Ownership Transfer, Break Glass
Every once in a while, an issue during the rebalance may cause a transfer to get stuck. Using transfers and ring-status, one can confirm which nodes are involved and where in the transfer process things are stuck. Keep an eye on transfers with "unknown" rates and long runtimes (listed next to the start timestamp), or handoffs waiting on something similar to "[riak_pipe_vnode]".
First step is to try restarting each of the two nodes involved, one at a time. Sometimes a node can take a while to come back online fully. Use the following command to monitor for a node to be ready after a restart:
riak-admin wait-for-service riak_kv
If that doesn't help, try attaching to the console to the original partition owner and run the following commands. NOTE: Do not use Ctrl+C while attached; it will kill the node. Use Ctrl+D to detach when finished instead.
old1$ riak attach
> riak_core_ring_manager:force_update().
> riak_core_vnode_manager:force_handoffs().
That should get things moving again. If not, try running this function for handoff stalls outlined in the Riak 1.0.2 Release Notes. Despite being for an older version of Riak, we've found that it can do the trick on newer versions as well.
Conclusion
Migration of a Riak cluster is simple and straightforward, particularly with the 1.2+ cluster commands. Basho has supplied excellent documentation for Riak if further information is needed on any command or process.